Project #1 Modular Animation
Description
Modular design is a term coined by the West as a response to mass-production, however the idea has long existed in non-Western cultures as early as the beginning of written languages. Create a set number of 2D primitive shapes and transform them to compose three different images using p5 math and the switch statement. No shapes should be added or subtracted throughout the transformations. Pay close attention to the positive and negative space each transformation creates.
Timeline
Jan 22 - Jan 29: Design Phase
Jan 29 - Feb 5: Production Phase
Due Dates
Jan 29: 12-frame storyboard
Feb 5: project due, present in class
Design Constraints
(1) Your canvas size should be 600px * 600px
(2) Use a set number of 2D primitive shapes and transform them to
compose three different images
(3) Use <= 3 colors for the sketch, though you are encouraged to
use
p5 blend mode to
"mix" additional colors
References
(1)
Daily Art by Saskia Freeke
(2)
Computational Graphic Design Manual
by mark webster
Resources
(1)
p5 Storyboard Template
(2)
p5 Hours - Degrees - Radians Diagram
(3)
Understanding Comics
-- this excerpt offers a really useful appraoch for articulating
strategies for both representational and abstract sequencing
Submission Guidelines
Please submit your sketch to two places:
(1) Submit your “Edit” sketch link to Canvas Project #1
(2) Add the “Embed” sketch link to the
Project #1 Glitch page
for presentational purposes
Study Guide
Design Phase
Modular Design

Before we begin to draw a storyboard for Project #1, let's first review the definition of modular design. By Wikipedia's definition, "modular design, or modularity in design, is an approach (design theory and practice) that subdivides a system into smaller parts called modules (such as modular process skids), which can be independently created, modified, replaced or exchanged between different systems". The application for modular design are endless and goes way beyond interaction design. Here are some examples of modular "designs" that were collectively generated in class:
- Legos
- Sushi
- Fashion Arrangements
- Modular Furniture
- USB adaptors
- Light Bulbs
- The Internet
- Cocktails
- Computer Parts
- The International Space Station
- Camera parts
- Automobile parts
- The game station
- Loading screen
- Tetris
- Honeycombs
- Janga
- Computer mice
- Chess
- Emergent systems
- Apartment layouts / units
- DNA
- Ecosystem
- Construction materials
- Restaurant menu
- Bedsets
- Natural elements
- Circuits
- Chipotle
- Letterpress
- Mr. Potato Head
- Bible denominations
- Power rangers
- Build a bear
- Cutomed makeup palette
- Multi-functional bras
- Cutomed makeup palette
- Lincoln Logs
- Tupperware
- Shopping cars
- Train tracks
- Modular tables
- Books
- Modular package design
Come up with an overall theme for your project, and jolt down some ideas for how you would express the theme through visuals and motions. When you begin to design your compositions and transformations, consider the following visual design principles:
- (1) Contrast
- (2) Hierarchy
- (3) Alignment
- (4) Balance
- (5) Proximity / Unity
- (6) Repetition / Movement
(1) Contrast
Contrast occurs when two or more elements in the composition are different from one another. Examples of contrast:


(2) Hierarchy
Hierarchy occurs when visual elements are arranged in a way that shows visual emphasis. The technique directs the viewers' eyes to see the most important visual element first and the least important visual element last. Examples of hierary:

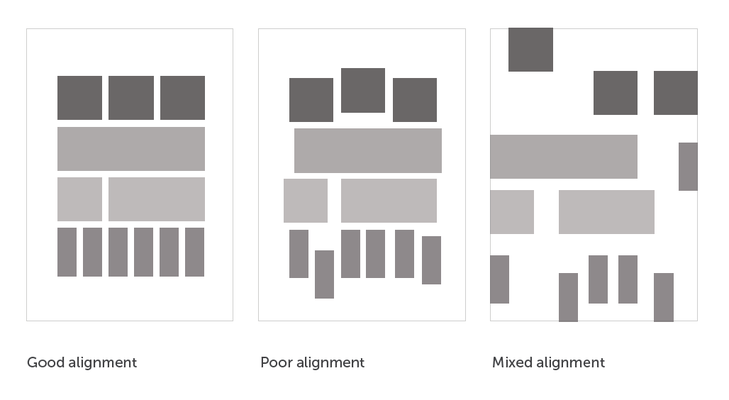
(3) Alignment
Alignment helps create visual cohesion by turning a group of elements into a "visual block". Examples of alignment:

(4) Balance
Balance represents the visual weight of a composition. It can be used to establish either a feeling of structure and stability (symmetrical balance and radial balance), or create a dynamic visual effect through a lack of balance (assymetrical balance). Examples of balance:


(5) Proximity / Unity
Proximity & unity occurs when the arrangement of a group of visual elements create a "secondary image". The principle of closure applies when we see complete figures even when part of the information is missing. Can you see the white triangle in the center image below?

(6) Repetition / Rhythm
Repetition occurs when a visual element is repeated in a orderly manner, and rhythm occurs when the repeated elements are arranged in a way that directs the eyes to move across the horizontal / vertical axises.

An example that explains modular animation:
Production Phase
Creating Basic Keyframe Animation in p5.js
In p5, we can create simple keyframe animations using the conditional statements. In the example sketch above, the ball transitions between keyframe A and B, and that is controlled by an if... else if statement:
Link to Source CodeJavaScript switch Statement
The switch statement is a type of conditional statement that is often used in programming to buildg a finite state machine (FSM). Different from an If / Else conditional statement which only executes a statement if an expression is true, a switch statement matches the expression with the case name and executes statements associate with the specific case. For example:
This block of code uses the variable num as the expression in the switch statement. Whenever num matches the case name, the program will execute the corresponding statement under the case. When num matches none of the case name, the program would execute the statement under default.
↳ click on screen to start animation.
Link to Source CodeHere are examples of creating animation using switch. You can think about each of the case as a keyframe, and figure out what needs to go under the case to make the shape transition into the next stage.
↳ click on screen to start animation.
Link to Source Code↳ click on screen to start animation.
Link to Source CodeFor the sake of clarity, I'm using mousePressed() to progress num in these examples. However you could also use millis() or frameCount() to create a timed animation.
Smoothing Animation Using lerp()
The approach above lets us move objects on the screen in constant speed. However the motion isn't always very smooth. This is where we could use the p5 lerp() function to interpolate the movement and create an easing and acceleration effect.
↳ click on screen to restart animation.
Here's the syntax for lerp():
By using lerp(), we can calculate a number (myVariable) between two numbers (start, stop) at a specific increment (amt). Try increasing / decresing the amt in the source code and see what happens.
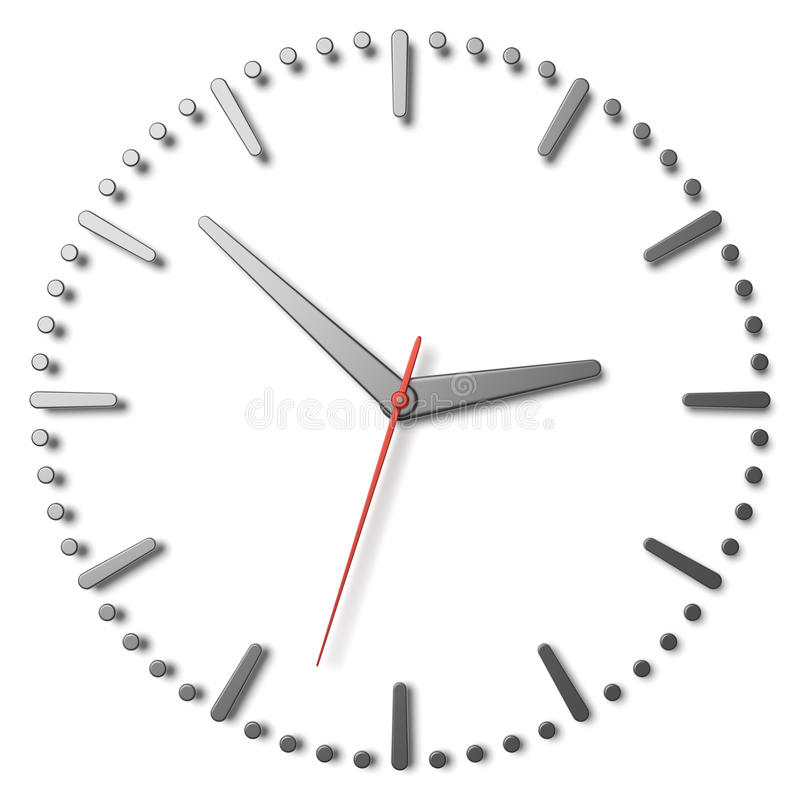
map()
The textbook definition of map() is that it re-maps a number from one
range to another. That might sound a little abstract, but we actually
have practiced the concept of map() WAAAAAAAY before learning to code.
One of the common examples is how we map seconds into minutes, and
minutes into hours when we read the clock. We have practiced this so
much that we inherently understand that half an hour is 30 minutes, and
three quarters of an hour is 45 minuetes.
Our minds are pretty good at mapping things in broad stroke, so what if
we need to find out how many minutes is 2.4 hour? or 7.35 hour?
This is where p5 map() comes in handy. Here's the syntax for map():
There are three pairs of numbers at work here:
- (1) Minimum (start1) and maximum (stop1) values that define the first range
- (2) Minimum (start2) and maximum (stop2) values that define the second range
- (3) The input value (value), which get compared to the start1 and stop1 range, and the final outcome (myVariable), which gets caculated based on the relationship between (1) and (2)
If that was hella confusing, this example might help you:
This sketch maps the range between minHour and maxHour onto minMinute and maxMinute. Then it takes currentHour, a value indicated by p5 hour() and get the result of hourToMinute.
Once you get the basic ideas of map(), you might wonder what else this is good for. The possibilities are endless, and you might have to encounter an actual problem to realize how useful map() is. One of the practical applications of map() is to make a slider:
↳ change value by dragging the slider.
Link to Source CodeFAQ
Q: What is a keyframe?
In both animation and filmmaking, a keyframe shows us the starting or ending point of a motion.

The idea of keyframe can be traced back to landscape photographer Edward Muybridge's photo experiment, which revolutionized the way we understand motion.

In drawn animation a keyframe literally refers to the first frame or the last frame of a transition. The position of keyframes on an animation timeline has an overpowering effect on how timing and movement is experienced.

Q: What is blend mode?
Blend mode blends the pixels in the display window according to the defined mode. This feature is identical to the blending feature in Photoshop. For example:
MULTIPLY multiplies the colors. The result will always be darker.
SCREEN is the opposite of MULTIPLY, uses inverse values of the colors.
OVERLAY mixes MULTIPLY and SCREEN by multiplying dark values and screening light values.