Project #2 Interactive Typography
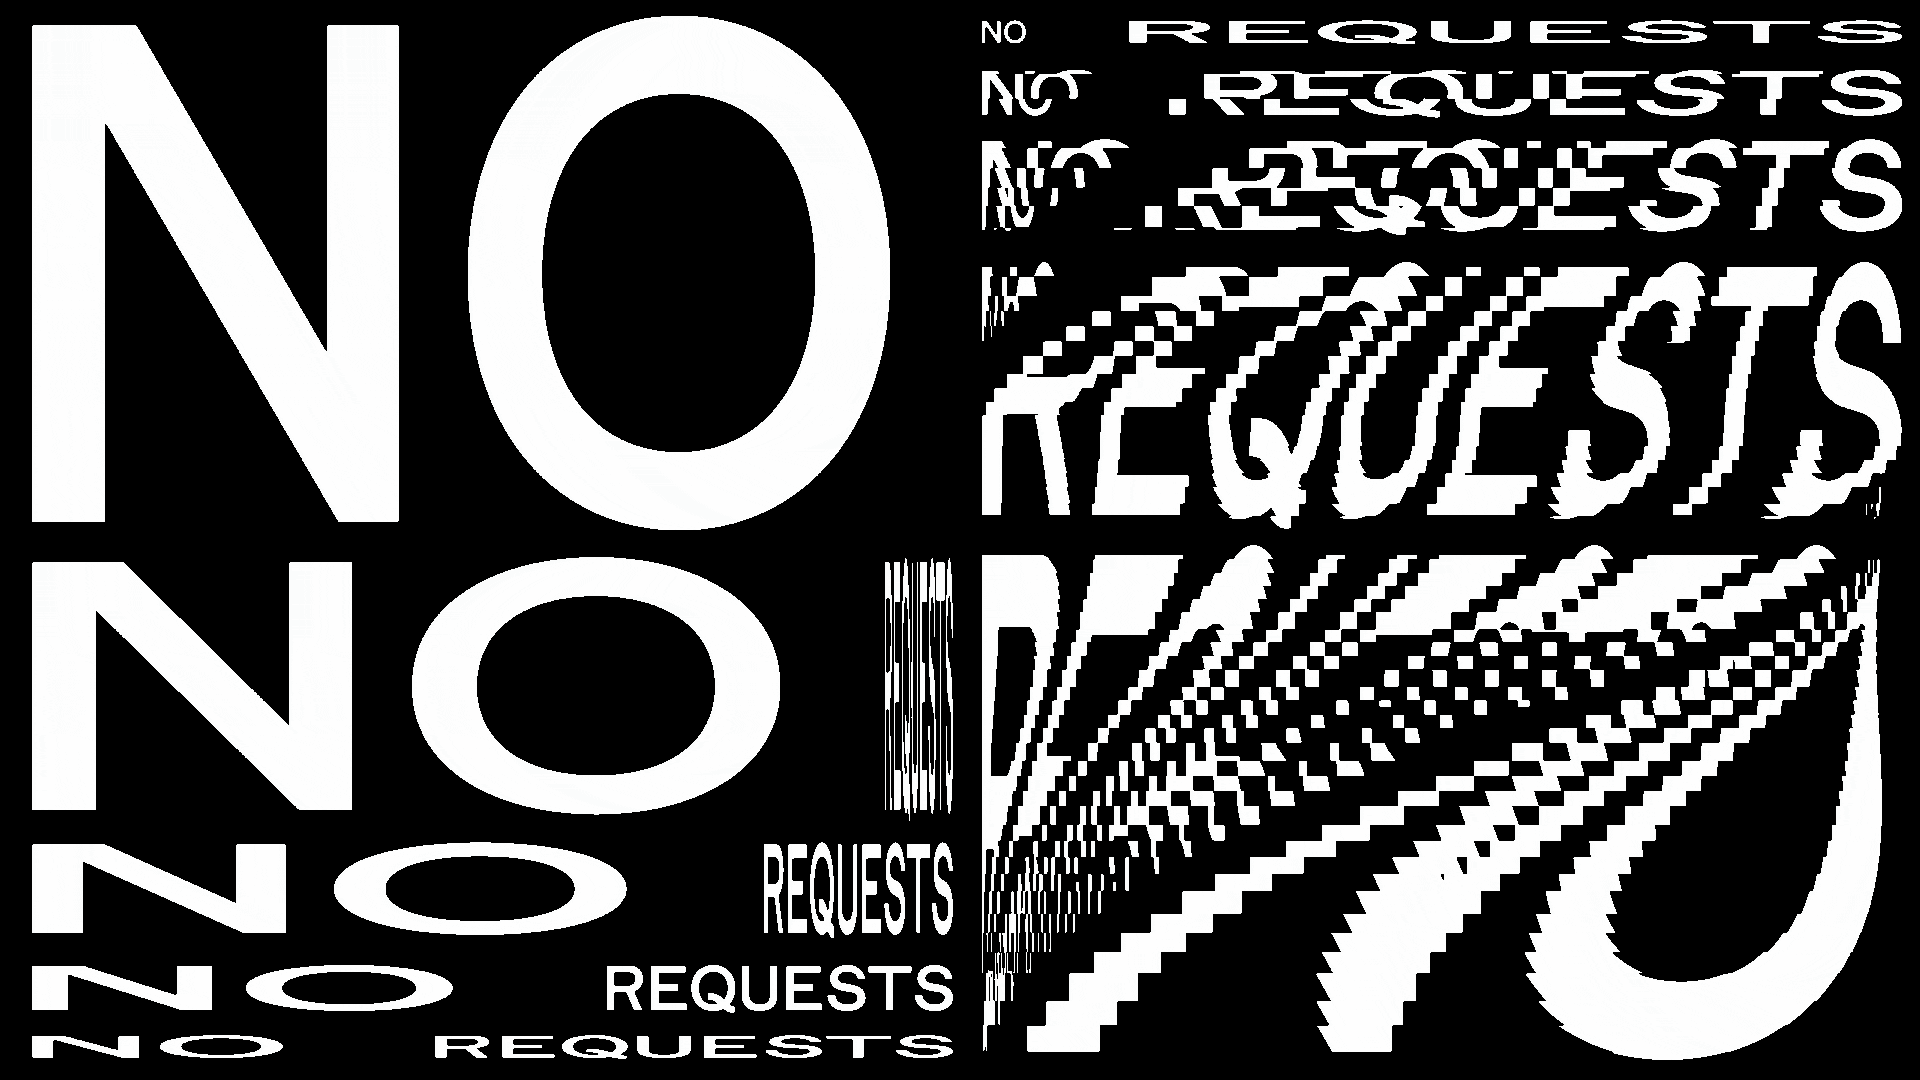
Image by DIA Studio
“Typography has something of a split personality — it’s both the
technical act of writing words into the world by giving them form, and
it’s also a way of understanding the world through the form of its
writing.”
— David Reinfurt, A *New* Program for Graphic Designer
Description
The look of a word has an enormous impact on how we understand the word.
For centuries, calligraphers and typographers have explored and developed different ways
to make type more expressive. Living in an era where computer
programming has become increasingly accessible to designers, typography
has adopted the principles of modular and parameterized design and
became more interactive.
For Project #2, you will pick three different words to create three
interactive posters. Incorporate textToPoints() and / or classes and
objects in the sketches. Your choice of shape, color, motion, and
interaction should thoughtfully reflect on the meaning of the word.
Reading
(1) Design as Art (excerpt) by Bruno Munari
Further Readings
(1)
Generative Design: Type (excerpt)
accomodated by
p5 examples, Benedikt Gross, Julia Laub, Claudius Lazzeroni, Hartmut Bohnacker
(2)
Steering Behavior, Coding Train Dan Shiffman
Timeline & Deliverables
Feb 12: Pick three words and create nine iterative prototypes in p5.js
Feb 19: Project due, present in class
Submission Guidelines
Nine iterative prototypes: submit your “Edit” sketch links to Canvas
Finalized sketches: submit your finalized sketches to Canvas as well as
the Project #2 Glitch page for presentation purposes
Design Constraints
(1) Your canvas size should be 600px * 600px
(2) Use one of the fonts provided in the study guide
References
(1)
Interactive Type
and
Alphabet Iteration
by Laurie Waxman (BFADT, '16)
(2)
P.Juicy by Haewon Park
(3)
Raumstaben
by Benedikt Groß
(4)
Studio Feixen
(5)
DIA Studio
(6) Laurent Malys's
IG
(7)
Type Me, Type Me Not
by Peter Cho
(8) Interactive posters by Dae In
Chung
(9)
Here, Now, and Waiting
by Moon Jang
(10)Space Type Generator by Kiel D. Mutschelknaus
Study Guide
Table of Content
(1) textToPoints() Basics
(2) textToPoints() Morph
(3) textToPoints() + Classes and Objects
(4) Removing / Adding / Swapping Objects Using JavaScript splice()
textToPoints() Basics
textToPoints() is a method in p5 that converts text into points on the screen. It’s an exciting feature that will allow us to manipulate type in new and surprising ways. In order for textToPoints() to work, you have to use a specific font format called OpenType font (OTF) in your sketches. Here are a couple direct links for you to download OTF fonts:
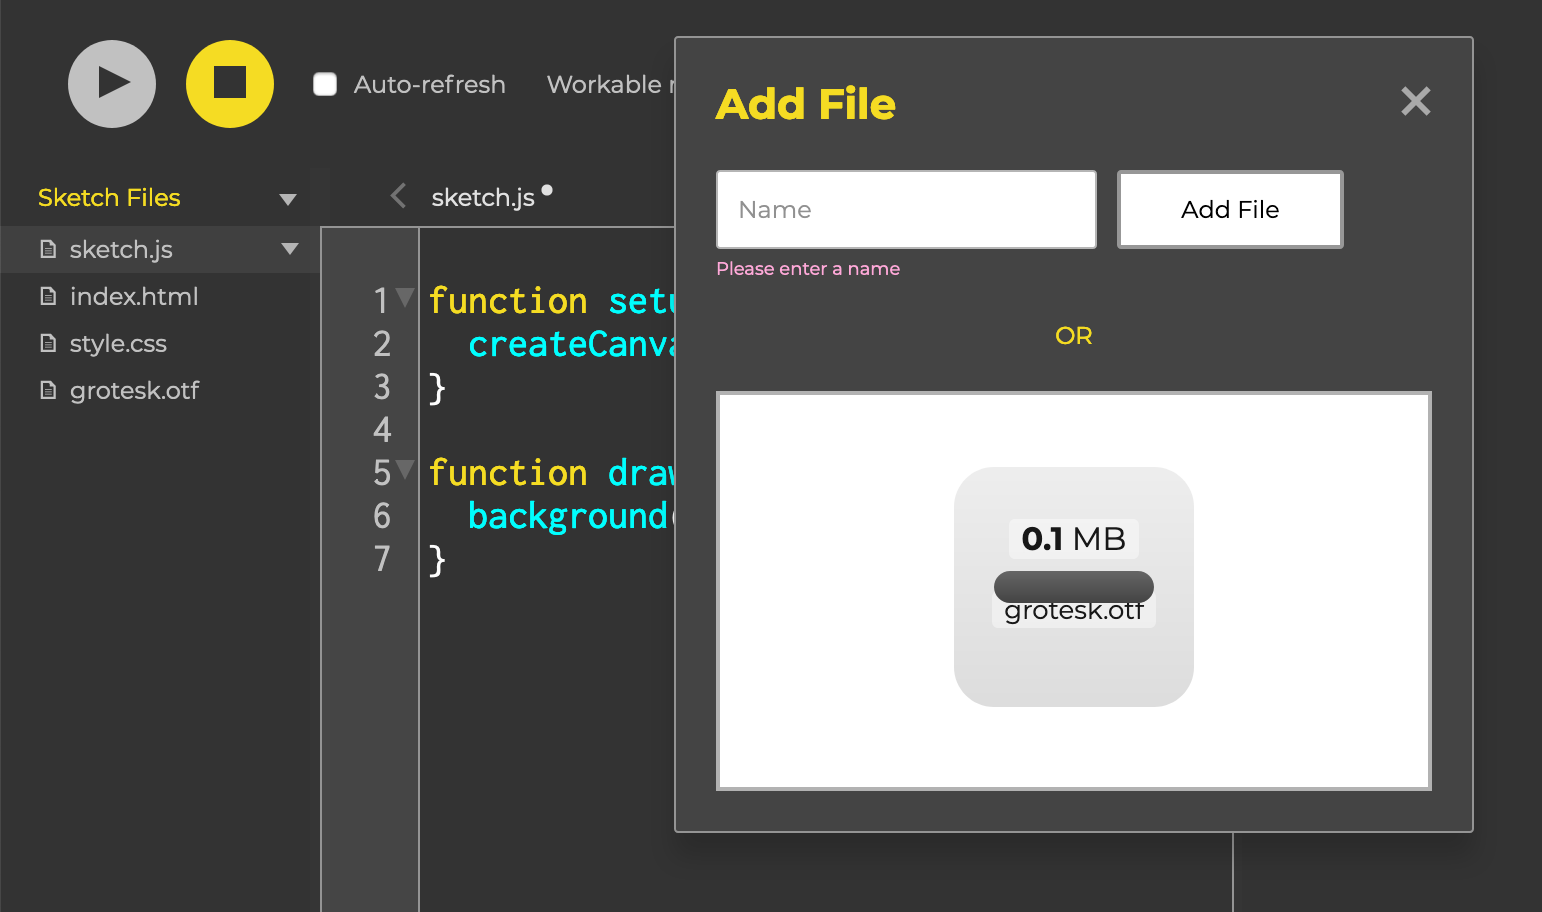
Loading Font
Once you download the files to your computer, open the p5 web editor. Go to Sketch > Add File and drag an OTF file to the dialogue box. Once it’s uploaded you should see the file showing up in your sketch folder on the left side of the editor.
Now to load the font file, you need to create a global variable to hold
the font and also load the font file from the preload() function.
Comparable to setup() and draw(), the preload() function makes sure that
your font is loaded before the browser loads the rest of the website.
The preload() function should be placed before the setup() function. And
inside setup(), you should load the grotesk variable inside
textFont(). This tells the program that you will be using Grotesk
as your default font.
Displaying Font
Once you have your OTF font loaded we can begin to display it. You can simply do this by adding this line in your draw():
Now let's intergrate textToPoints() into the progarm and convert the
pre-exisiting vertices inside our word into points.
To do this, you will need to create a new variable that holds the
textToPoints() array:
There are five parameters inside the textToPoints function here. Let's break it down one by one:
- (1) txt: the first parameter takes a string of text
- (2) x: the second parameter takes a x position value
- (3) y: the third parameter takes a y position value
- (4) fontSize: the forth parameter takes a font size value
- (5) sampleFactor: the fifth parameter is the most important one to understand here. It defines how many points to draw along the text. The defacult value is 0.1, the higher number you enter here results in higher resolution, and lower number results in lower resolution
Now if you print the variable hiArray in the program, you are going to get a funny message in the p5 console:
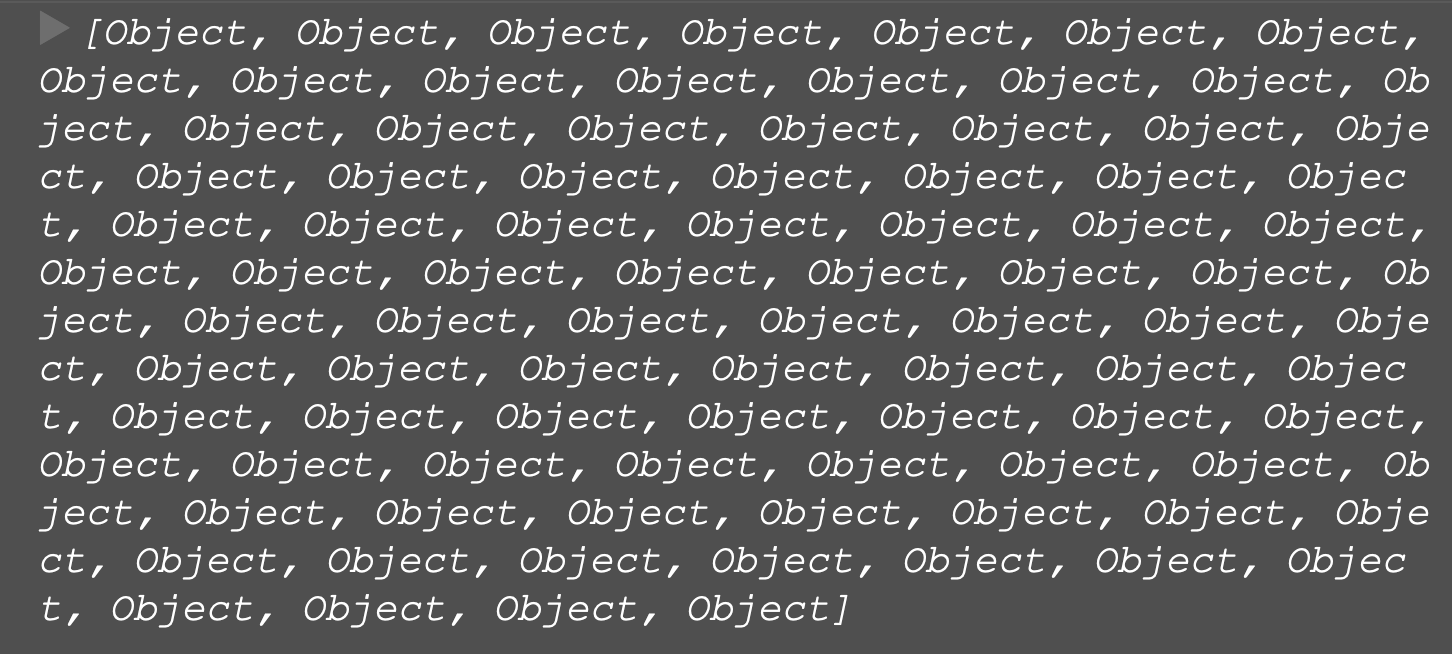
Let's open Chrome's built-in debugging console to take a deeper look at these objects. You can open the console by going to View > Develper > JavaScript Console.
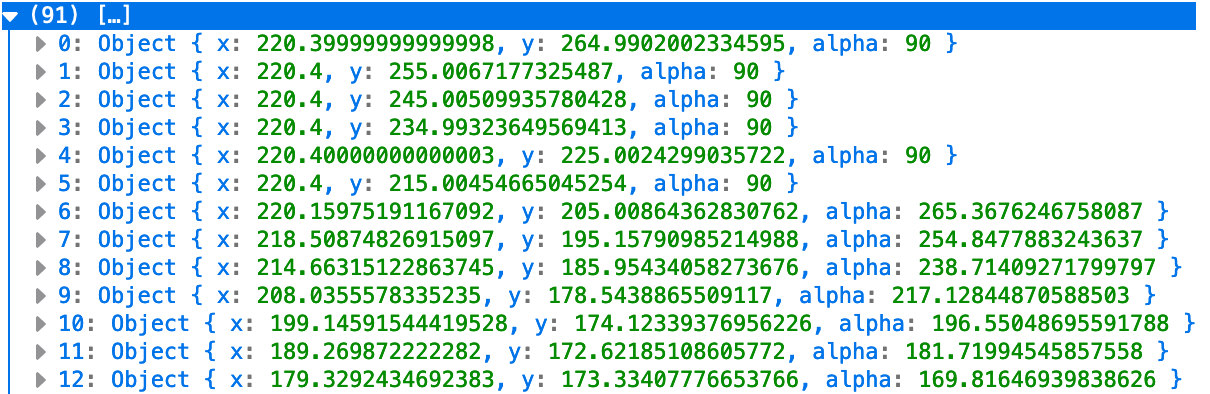
Turns out that our hiArray variable has taken all the verticies
from the text and turned it into an array of objects. Each of these
objects inside the array contains a variable x, a variable y, and a
variable alpha. Being able to access these variables mean that we can
also alter and manipulate them to make interactive type. Amazing!
We have created a bunch of variables in the program, but we haven't
drawn anything on the canvas yet. Since hiArray is simply an
array of objects that contain all the x and y values we need to display
the text, we can use a for Loop to pull all the x and y values out of
hiArray to draw ellipses:
You can do A LOT by combining what you've learned so far. Try changing the ellipse into other types of 2D primitives and begin code sketching and creating iterations. Check out more examples here and here and here!
Changing Number of Verticies
Once you've gotten comfortable with the ideas above, let's try changing the number of verticies in your text. This can be achieved simply by changing the sampleFactor parameter inside textToPoints():
↳ use UP / DOWN keys to adjust the number of verticies.
Link to Source CodeWhen you make changes to sampleFactor, just keep in mind that it's very sensitive, and most of the time you'd only want to make changes that are within a decimal range.
Connecting the Verticies using beginShape() and endShape()
You might remember this childhood game called Connect the Dots. It is a form of puzzle containing a sequence of numbered dots. When a line is drawn the outline of an image is revealed.
textToPoints() operates on a similar logic — it reveals the dots that crawl along the shape of the text. So what if you want to connect all the verticies together using an outline? A great p5 feature we could use here is something called beginShape() and endShape(). These are magical functions that connect verticies into a complex shape. Usually it is written this way:
But since we already have all the x and y information we need contained
inside the hiArray variable, we could just plug that information
into vertex(x,y).
Here's how you would write it:
And it creates this!
As you can see, beginShape() and endShape() treats both "h" and "i" as one shape and attempts to connect both together. If you'd like the two to be separated, you have to create two individual textToPoints arrays to separate the "h" and the "i".
textToPoints() Morph
Now that you know how to change the number of verticies in a letter and
using beginShape() and endShape() to connect the dots, we are going to
try something exciting. What about creating a morphing effect that would
transform one letter into another letter?
Code sketches by Laurent Malys @laurent.malys
There are a couple steps we need to take here. First, load and display
your OTF font. Then create two empty array global varialbes at the top
to hold our textToPoinst() objects. This way we can access the objects
outside of setup() later.
Next, we have to make sure that the number of verticies in the first
letter matches the number of verticies in the second letter, so that
each vertex has an ending position to move towards. We will achieve this
by tweaking the sampleFactor values of the letter one and letter two
until they match. Note that whenever you change the font size or the
string, the number of verticies on your text will change.
Now, let's use the beginShape() technique we've learned from the previous chapter to connect all the verticies around the first letter inside draw().
The next step is to make all the x and y in the first letter to move towards all the x and y inside the second letter. We can do this through if statements.
Link to Source CodeUsing loop() and noLoop() to Start / Pause the Sketch
↳ click to begin morphing; click to pause transformation
We have been taught that draw() runs a loop and executes the code
repetitively. However there is a way to pause draw() and start it again
by using
noLoop() and
loop().
Try adding this line at the bottom of your setup():
Your sketch should draw the first letter but stop after that. This means the code inside draw() has been executed once but won't be looping. Now let's incroporate a mousePressed() function so that the sketch would start looping when mouse is pressed.
The play boolean variable is initated as false, and when mouse is pressed, play becomes true. And if statement follows it to make draw() loops if play becomes true. Sweet!
Link to Source CodetextToPoints() + Classes and Objects
↳ click to "mop" the screen
There are a couple benefits to combining textToPoints() with classes and objects. First of all, it could help with code organization. Secondly, you could add additional "behaviors" inside the classes which would be inherited by the objects, and each object can operate individually. If you need a refresher on how classes and objects work, check out this cheat sheet or this video tutorial.
Now let's re-create the "MOP" sketch above. After loading and displaying an OTF font in a new sketch. Create a class below draw():
Notice that I've created two parameters x and y inside the constructor argument. Once we create an array of objects in the next step, we will take the x and y values from the textToPoints() array and pass them into constructor(). I've also created a show() method inside the class. We will be using these rectangles to draw the outline of the first alphabet.
The next step is to create a global variable that is an empty array, to hold the objects for class Alphabet1:
And create an array of objects inside setup() after textToPoints() is declared. This is where we pass the x and y values from textToPoints() into the constructor argument.
The next step is to show the text outline on screen. Let's create another for Loop inside draw(), and place _alphabet1[i].show() inside the loop:
You should see your first alphabet displayed on the screen. We've successfully "borrowed" the array of x and y from textToPoints() and plugged them into class and objects. Here is a link to all the code I've written so far.
There are three alphabets in this example — "M", "O", "P". We have finished the setup for M. The next challenge is for you to repeat the steps to set up O and P. Don't forget to adjust the sampleFactor for each of the letter so that the numbers of verticies match.
... ... ...
Once you're done with that, let's begin to code our M — O transformation. This works the same way as the previous morphing tutorial, except for the sake of organization, I'm going to place this block of code a function called morph1.
Load morph1() inside draw() and you should see M morphing into O. Your next challenge is to repeat the steps and create the O — P transformation inside morph2().
... ... ...
Next, let's use the switch statement we've learned from Project #1 as a means to advance the letter morphing on mousePressed():
Now you should be able to morph from M — O — P. But for an interactive project to be effective and not look broken, you should find a way for P to loop back to M instead of stopping. Can you figure out how to make the sketch loop? (hint: there are more than one answers)
Link to Source CodeAdding Behaviors
Now that you know how to combine textToPoints() with classes and objects, you can reflect on the different amazing things you did with classes and objects in Code 1 and think about the behaviors you could add onto your prototypes. Here's an example that uses dist() to contain a swarm of circles inside the text:
Link to Source CodeRemoving / Adding / Swapping Objects Using JavaScript splice()
JavaScript splice() makes it very easy to remove, add and swap objects inside an array. The syntax for splice() is:
There are three parameters inside splice(). Let's break it down one by one:
- (1) start: the index at which to start changing the array.
- (2) deleteCount: the number of items to remove from the array. Put 0 here if you don't want to remove an item. This parameter is optional.
- (3) item1, item2 ...: The elements to add to the array, beginning from start. If you do not specify any elements, splice() will only remove elements from the array. This parameter is optional.
Removing Objects
↳ click to remove / replenish ellipses
When you want to remove objects from an array, you only need to use the first and second parameters in splice(). For example, here's a row of ellipses created using class and objects:
Let's add a mousePressed function, so that every time mouse is pressed, an ellipse is removed from the array.
Great! Now let's iterate the code so that when all the ellipses are removed from the array, we replenish the ellipses by re-creating the array of objects.
Link to Source CodeNow that you've learned the basic concept, take a look at this example that removes the outline of the letter M upon contact with the particles.
Link to Source CodeSwapping Objects
↳ click to swap / replenish objects
When you want to swap objects inside an array, you will indicate the number of arrays you want to remove in the second parameter and enter object(s) in the third parameter and beyond. In this example we want to create a class Bubble and a class Box, each producing an array of objects. Then inside mousePressed() we will instruct the program to swap the ellipses and the boxes upon mouse clicks:
Inside draw(), you have to create two separate for Loops to show the bubbles and the boxes. However, you don't want to show all of the boxes at once. You only want to show them when they match the index number of the bubbles.
If you're slightly confused by the if statement here, visit the link to source code and try to print out the bubbles and boxes arrays in the console and compare how they change when you click on the screen.
Once you've grasped the basic concept, take a look at this example that swap the rectangles around the M to ellipses.
Link to Source CodeAdding Objects
Adding objects uses the nearly identical code as the previous example. Can you take a look at the source code below and figure out what the differences are?
Link to Source Code