Project #4 Experimental Camera
Try the camera out here
Description
What does it mean to design a camera that is meant to capture a specific
person, place, or object in mind?
What does it mean to make a camera that is meant to capture bodies that
are living under the coronavirus crisis?
How do we want to document our domestic life while we self-quarantine?
How can camera filters change the way we perceive ourselves and the
others?
For project #4, you will design and create an experimental camera with a
specific purpose and usage in mind. Make an intentional choice on
whether this camera will be used on a desktop or on a mobile device. The
camera should inspire the user to capture images in new and surprising
ways. You are expected to interact with the DOM, and use
createGraphics() and / or loadPixels() in your camera design.
Required Readings
(1)
Closing the Loop, Aria Dean
(2)
Generative Design: Image (excerpt), accomodated by
p5 examples, Benedikt Gross, Julia Laub, Claudius Lazzeroni, Hartmut Bohnacker
Further Readings
(1)
Image Recognition Using Edge Detection, Alibaba Cloud
(2)
iPhone X Facial Recognition: How Apple's New Face ID Actually
Works, Andrew Griffin
References
(1)
User is Present
, Kate Hollenbach
(2)
Gaze Makes the Glitch, Cyber Witch
(3)
Shrub, Linked by Air & Jeffrey Scudder
(4)
Facial Weaponization Suite, Zach Blas
(5)
Merge /
Multix /
Sheets /
Gush, Adam Ferriss
(6) Glance Back, Maya Man
(7)AR Experiments, multiple creators
Resources
(1)
Instagram Filters with p5.js, Kelly Lougheed
(2)
Beyond the Canvas, Evelyn Masso
(3)
Video and Pixels Playlist, Coding Train
(4)
Creating face filters with clmtrackr.js + p5.js, Lauren McCarthy
(5)
Computer vision examples, Kyle McDonald
(6)
clmtrackr.js References, Audun Mathias Øygard
(7)
p5.js Shaders Tutorial, Casey Conchinha and Louise Lessél
(8)
Pixel Manipulation with p5.js: Build your own video mirror!, jiwon
Timeline & Deliverables
March 25: Submit proposal for your exprimental camera to Canvas. The
proposal should include an overall description that describes the goals
of your experimental camera and an illustration of the interface design.
April 1: Complete white-boxed version of the project.
April 15: Project due, present during class.
Submission Guidelines
Submit proposal and white-boxed version of your project to Canvas
Submit your finalized sketch to Canvas as well as the Project #4 Glitch
page for presentation purposes
Design Constraints
(1) Your canvas size should be windowWidth * windowHeight
(2) Your project should be either desktop or mobile-friendly
(3) Your project should interact with the DOM
(3) Your project should use createGraphics() and / or loadPixels()
Study Guide
Table of Content
(1) Interacting with the DOM
(2) clmtrkr.js
(3) createGraphic()
(4) copy()
(5) set() and get()
(6) loadPixels() and updatePixels()
(7) Performance Management
Interacting with the DOM
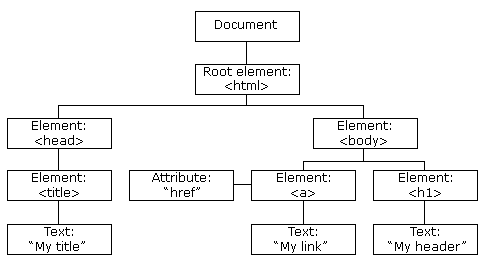
Whenever a web page is loaded, the browser creates a Document Object Model (DOM) for the loaded page. DOM arranges all the elements on the web page into a tree diagram —
And the amazing part is, we can interact with the elements on this tree diagram from our sketch.js in the p5 editor! If you visit the p5 refrence's DOM section, you will find a number of DOM elements that are ready to be loaded into your sketch. Elements that are relevant to this project are:
createCapture()
The most important DOM element we need for Project #4 is createCapture(). Essentially createCapture() lets you access the user's webcam through the browser. The code to load the webcam is very simple, however it is important to remember that you should put createCapture() inside setup(). Putting it in draw() will create a new capture every frame and crash the program!
When you hit play, your browser should ask for your permission to access your web cam. Once you accept it, you should see your image stacked below the p5 canvas.
Web cam is a highly sensitive device that comes along with layers of security measures. We wouldn't normally want any website to just turn on our webcam without asking for our consent. If your web cam isn't turning on inside the browser, a lot of times it's because you need to go into your browser setting and give permission to specific websites to access the web cam. This is true for both laptops and mobile devices. The sercurity measurements on mobile devices tend to be stricter than laptops, and iOS tends to be stricter than Androids.
Next, let's make the video feed appear inside of our canvas instead of below. In order to do that, we can actually feed the capture variable directly into the image function. And just for fun, I'm also going to use one of the p5 filter functions to invert the video feed:
By now you should see two video feeds, one inverted and one normal. You are well on the way of creating an experimental camera! Next let's hide the lower video feed that's automatically generated by createCapture():
createButton() + saveCanvas()
↳ click on button to take a picture :)
In this section, we will combine another DOM element createButton() and p5 function saveCanvas() to take a screenshot from the webcam and save it to your local device. Let's start from adding a button to the program. And let's also create a custom function that will execute when the button gets clicked on:
Now whenver you click on the button, the string "you took a picture" should be printed in your console. If you're feeling lost, it might help to check out a different example here.
The next thing we have to do is to intergrate savaCanvas() into the program, so that everytime the button is clicked, the progam would save a photo to the computer. The syntax for saveCanvas() is:
saveCanvas(selectedCanvas, [filename], [extension])
We want saveCanvas() to execute when the button is clicked, so we should put it inside takePic(). And we can also create a variable to store createCanvas() in:
Now try to click on the button. If your browser downloads an image, then hooray! You've just created a camera and took the first photo of yourself! Your camera should work if you open the sketch on an Android device. If you'd like your camera to work on iOS 11 devices as well, here's an additional line of code you need to add inside your setup():
Link to Source CodeNote: working on camera software across different devices is a constant struggle, because software on those devices are constantly updating. Remember when your software stopped working after you've updated your operating system? This is a similar issue. Just keep in mind that this struggle is a completely normal. It's part of what it means to code. When I encounter weird problems like this in p5, the first place I go to find my answers is p5's github issues.
clmtrkr.js
Many of you are curious about exploring facial recognition for this project, so I'm adding a chapter on clmtrkr.js, a JavaScript library that can be easily intergrated into p5.js. You can use it to create AR face filters, analyze facial expressions, or even use your face as an input to play a game.
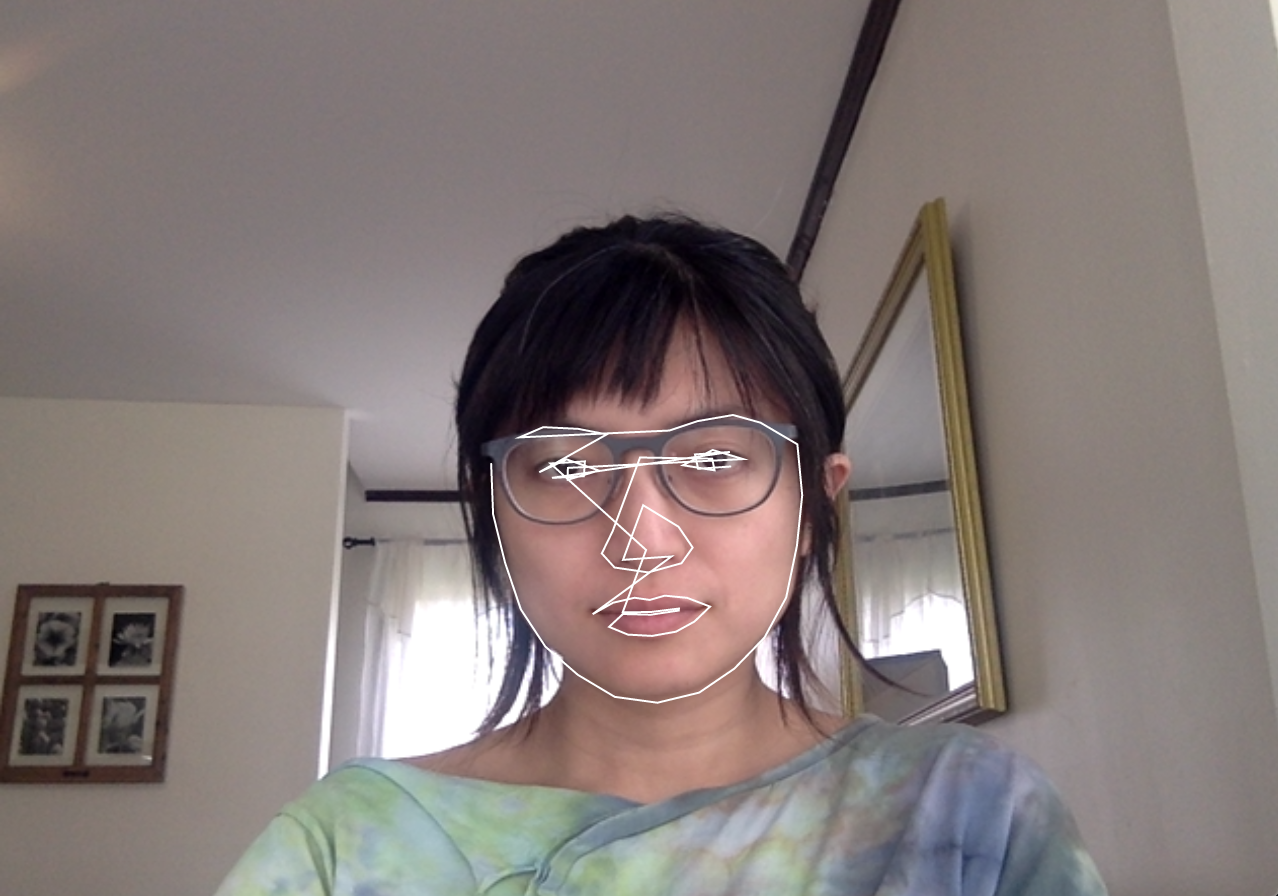
This might sound complicated, but the good news is the mechanism actually works very similarly to the textToPoints() function we've already worked with in Project #2. Instead of translating text into an array of x and y, clmtrkr.js helps translating our facial contour into a sequence of points —
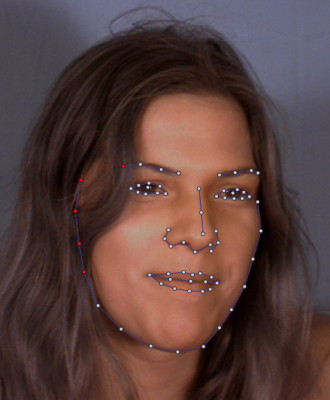
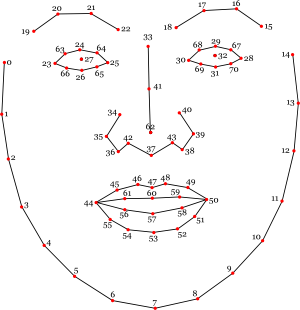
What's convenient is that clmtrkr will always generate a total of 70 points around the face, so if you want to draw something on the tip of the nose it will always be point 62, the left eye and the right eye will always be point 27 and 32.
If you want to learn more about how clmtrkr works behind the scene, I'd recommend checking out this blog post.
Setting up clmtrkr.js in the p5 Editor
Let's use this code template as a starting point. It includes what we've gone through in the createCapture() section above. To add the clmtrkr.js library into your p5 sketch, you'd want to open your index.html page and insert the library before your p5 library:
Next let's open sketch.js and create a global variable let tracker at the top of the sketch. And let's also add line 12~14 from the code example below into your setup(). I will give a brief explanation of what each of those lines does next to the code, but if you want to dig deeper please check out clmtrkr's reference page.
You've initated the clmtrackr object, but nothing is happening on the screen yet. Let's add this important line in draw() so that the tracking points will be continuously updated when the program runs.
Now all the tracking points would be stored inside positions. Next, let's add the block of code below into draw(). Using beginShape() and endShape(), we can connect all the tracking points together to draw and outline of the face!
Source CodeNow keep your face in the center of frame and make sure that your face is fairly well lit. If you see an overlayed white outline around your face, then congrats! You've got a basic facial recognition system in your p5 sketch.
Now, we've entered an uncharted territory here. What's actually inside positions? What is the two-bracket business in positions[i][0] and positions[i][1] all about? Hum, let's print positions in draw() to take a peak at what's inside the variable:
When you hit play, you should see something like this inside your console:
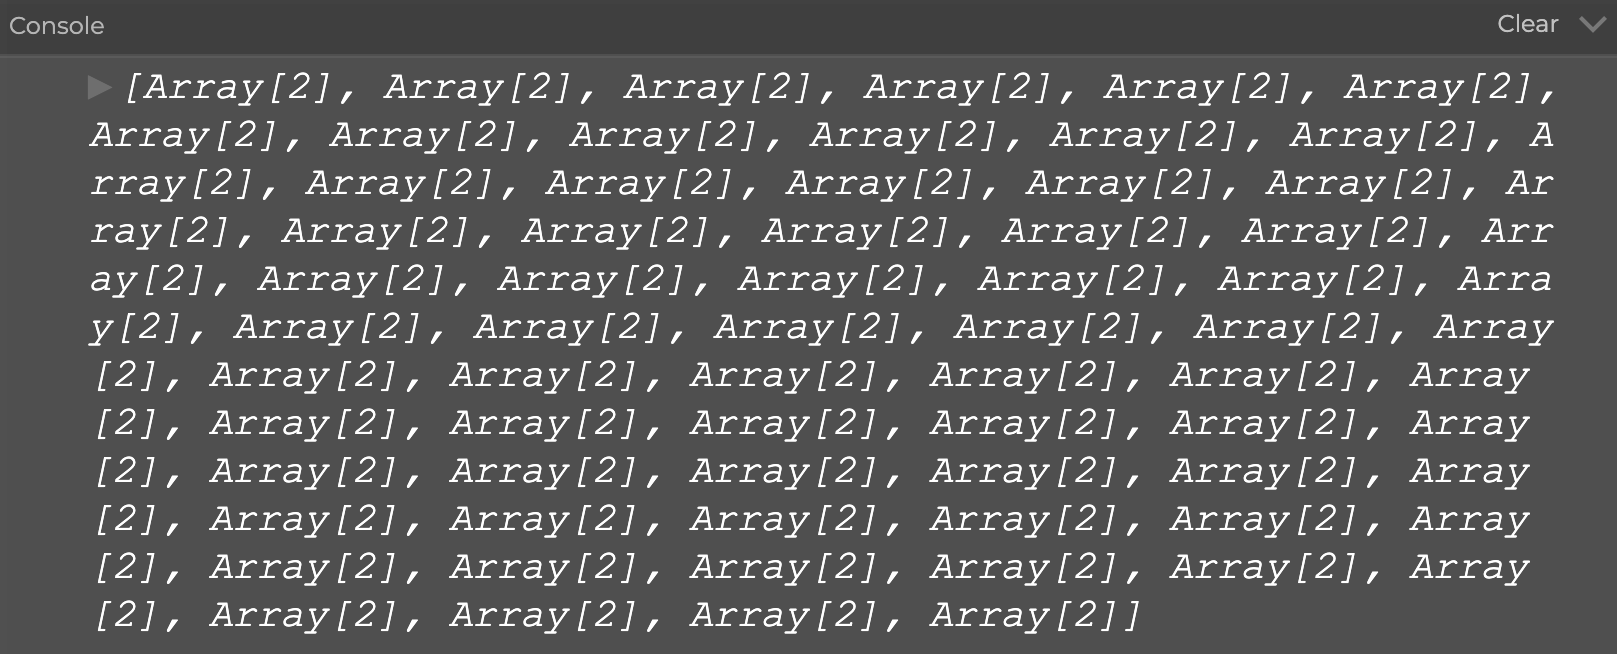
And if you stop the sketch and click on the tiny arrow in front of each print, you should be able to look inside of the structure and see something like this:
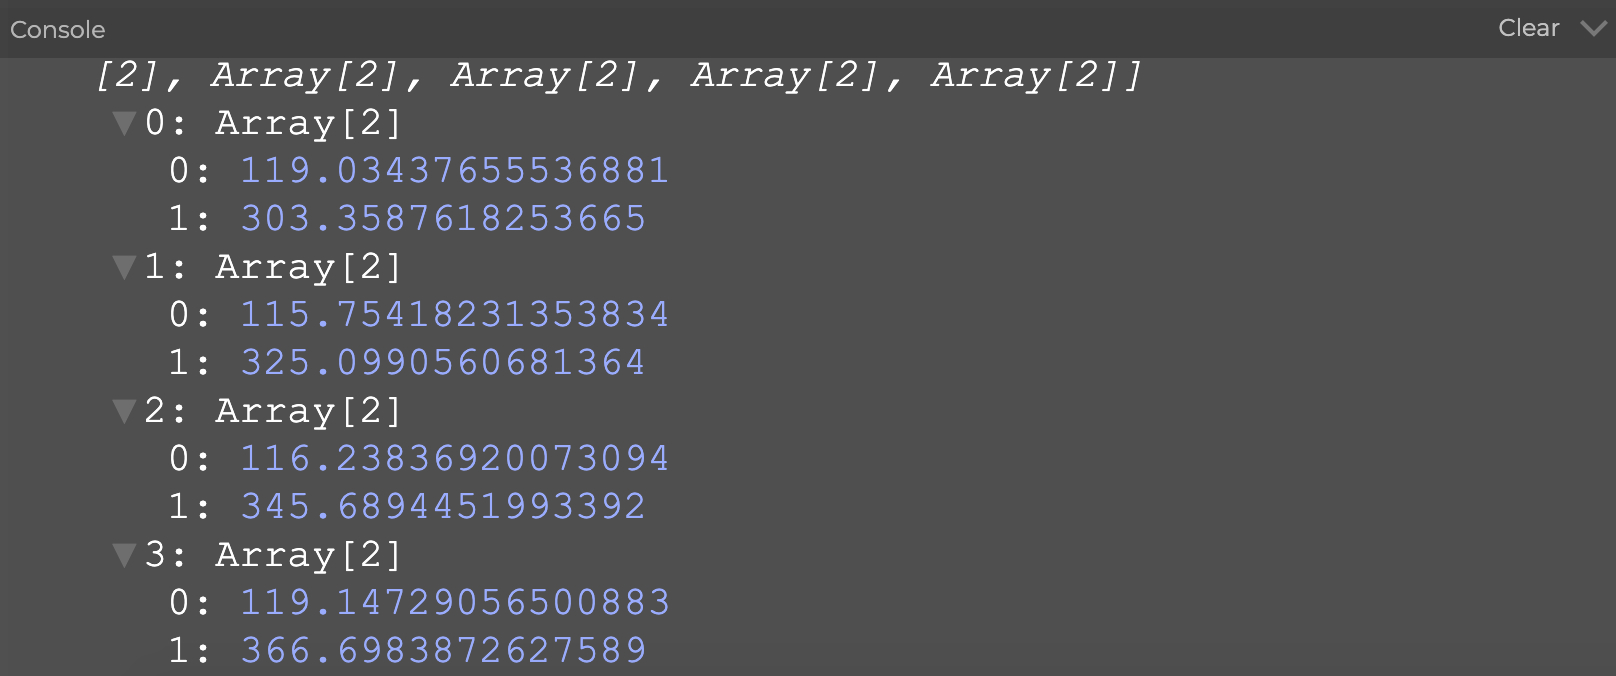
This is a new data structure that we haven't talked about in this class. It's got a fancy name — the two-dimensional array.
Two-Dimensional Array
So far we have mostly been working with one-dimensional array. If we compare writing an array to making a list, the list version of let groceries = [“pasta”, “dumplings”, “bread”] would look like this
- Pasta
- Dumpling
- Bread
However, if I really shop for those groceries in real life, I'd probably need to create a sublist under every food item, detailing what ingredients I need. And this is what two-dimensional array allows us to do — we can add an additional sublist to an exisiting list. Essentially, tw-dimensional array is an array of an array; a list of a list.
- Pasta
- Tomato
- Basil
- Spaghetti
- Dumpling
- Dumpling wrapper
- Cabbage
- Ground pork
- Bread
- Flour
- Yeast
Let's apply these concepts to p5. If I were to create a pizza ordering progarm that lets my customers choose their own toppings using a one-dimensional array, it would look like this:
And in a two-dimensional array it would look like this:
I've snuck in a neat trick, console.table() in the code. Hit play and see a surprise in the console :)
Most importantly, how do we order a specific pizza topping from array2D? If you'd like to order a plain bread, you would type this into the program:
Now here's a coding challenge for you — make the console print out "I'd like a pizza with whole wheat bread, red sauce, mushrooms with mozzarella and goat cheese". If you get stuck, check out the answer here.
Adding AR Overlay
Finally, let's return to looking at the two-dimensional arrays inside the clmtrackr exmple. It turns out that under every tracking point, there is an [x, y] array that store the x and y values of each tracking point. By writing positions[62][0] we get to access the x value of tracking point number 62, and by writing positions[62][1] we access the y value.
Knowing this, let try something fun by adding this block of code to the clmtrackr example inside draw():
If you see a circle popping up in front of your nose, hooray!
You might ask why we need to add an IF statement that checks whether positions.length is larger than 0. If you try to comment that out you will get an immediate error when the program starts. The reason for this is because it takes a second for the program to register your face. Without the IF statement, the program would try to access the positions data without actually having the data, causing the program to crash.
For the sake of organization, the next thing we could do now is to add dots and numbers to the sketch to show where each tracking points are on the screen.
Source CodeFacial Expression Analysis

↳ A detail of “Machine Readable Hito,” 2017. Trevor Paglen / Metro Pictures, New York
While facial recognition software is mostly used as a discriminatory and surveillance tool, artists and designers should feel empowered to use it in ways that is critical and expressive. It's our responsibility to work with a problematic tool with thoughtfulness and intentionality.
Here's an example of how you would analyze someone's smile — add this block of code into your existing clmtrakr sketch:
Source CodeIf you try out the sketch, you'd see that this idea of "emotional analysis" is actually extremely superficial. Essentially, you are just comparing the distance and relationship between two or more tracking points on the face. Try adding your own feature, such as making the bar grow if your eyebrow raises. Once you get comfortable with adding your own features, try to find creative and surprising ways to work with the technique.
createGraphics()
Remember when you first learned about the background() function in p5, and you had to choose between leaving a trail of ellipses on the screen when you moved your mouse around versus clearing the background and leaving only one ellipse on the screen? Well, those days are officially over — createGraphics() give you the ability create multiple layers on top of your canvas. You could do things such as assigning a background() to the bottom layer and no background for the top layer; or cut part of a layer and paste it onto a new layer. This is pretty much the closest to Photoshop we're ever going to get in p5.js!

Just like createCanvas(), createGraphics() is a p5.elements that is usually initiated in setup():
The line layer1.ellipse(mouseX, mouseY, 25, 25) assigns ellipse() as a child of layer1. There are many other p5 functions that could be assigned as children of the layers, check out the source code for the sketch below to see a more complete version of my drawing program —
↳ hold your mouse down to draw
Source CodeNow, if we combine createGraphics() with createCapture(), we could come up with many wonderful ideas for our experimental camera. For instance, I could draw a picture with my nose!
copy()
copy() is a p5 function that lets you copy and paste a specific region of the canvas. Like the good ol' days of Photoshop. This is the syntax for copy():
copy(srcImage, sx, sy, sw, sh, dx, dy, dw, dh)
As you can see, there are nine parameters inside the copy function! This may seem daunting at first, but once you understand what each of them do it is actually pretty straight forward. Let's break them down one by one:
- (1) srcImage: source image. This can be an image you upload, or an image generated by createImage(), createGraphics(), or createCapture()
- (2) sx: source image's x coordinate
- (3) sy: source image's y coordinate
- (4) sw: source image width
- (5) sh: source image height
- (6) dx: destination image's x coordinate
- (7) dy: destination image's y coordinate
- (8) dw: destination image width
- (9) dh: destination image height
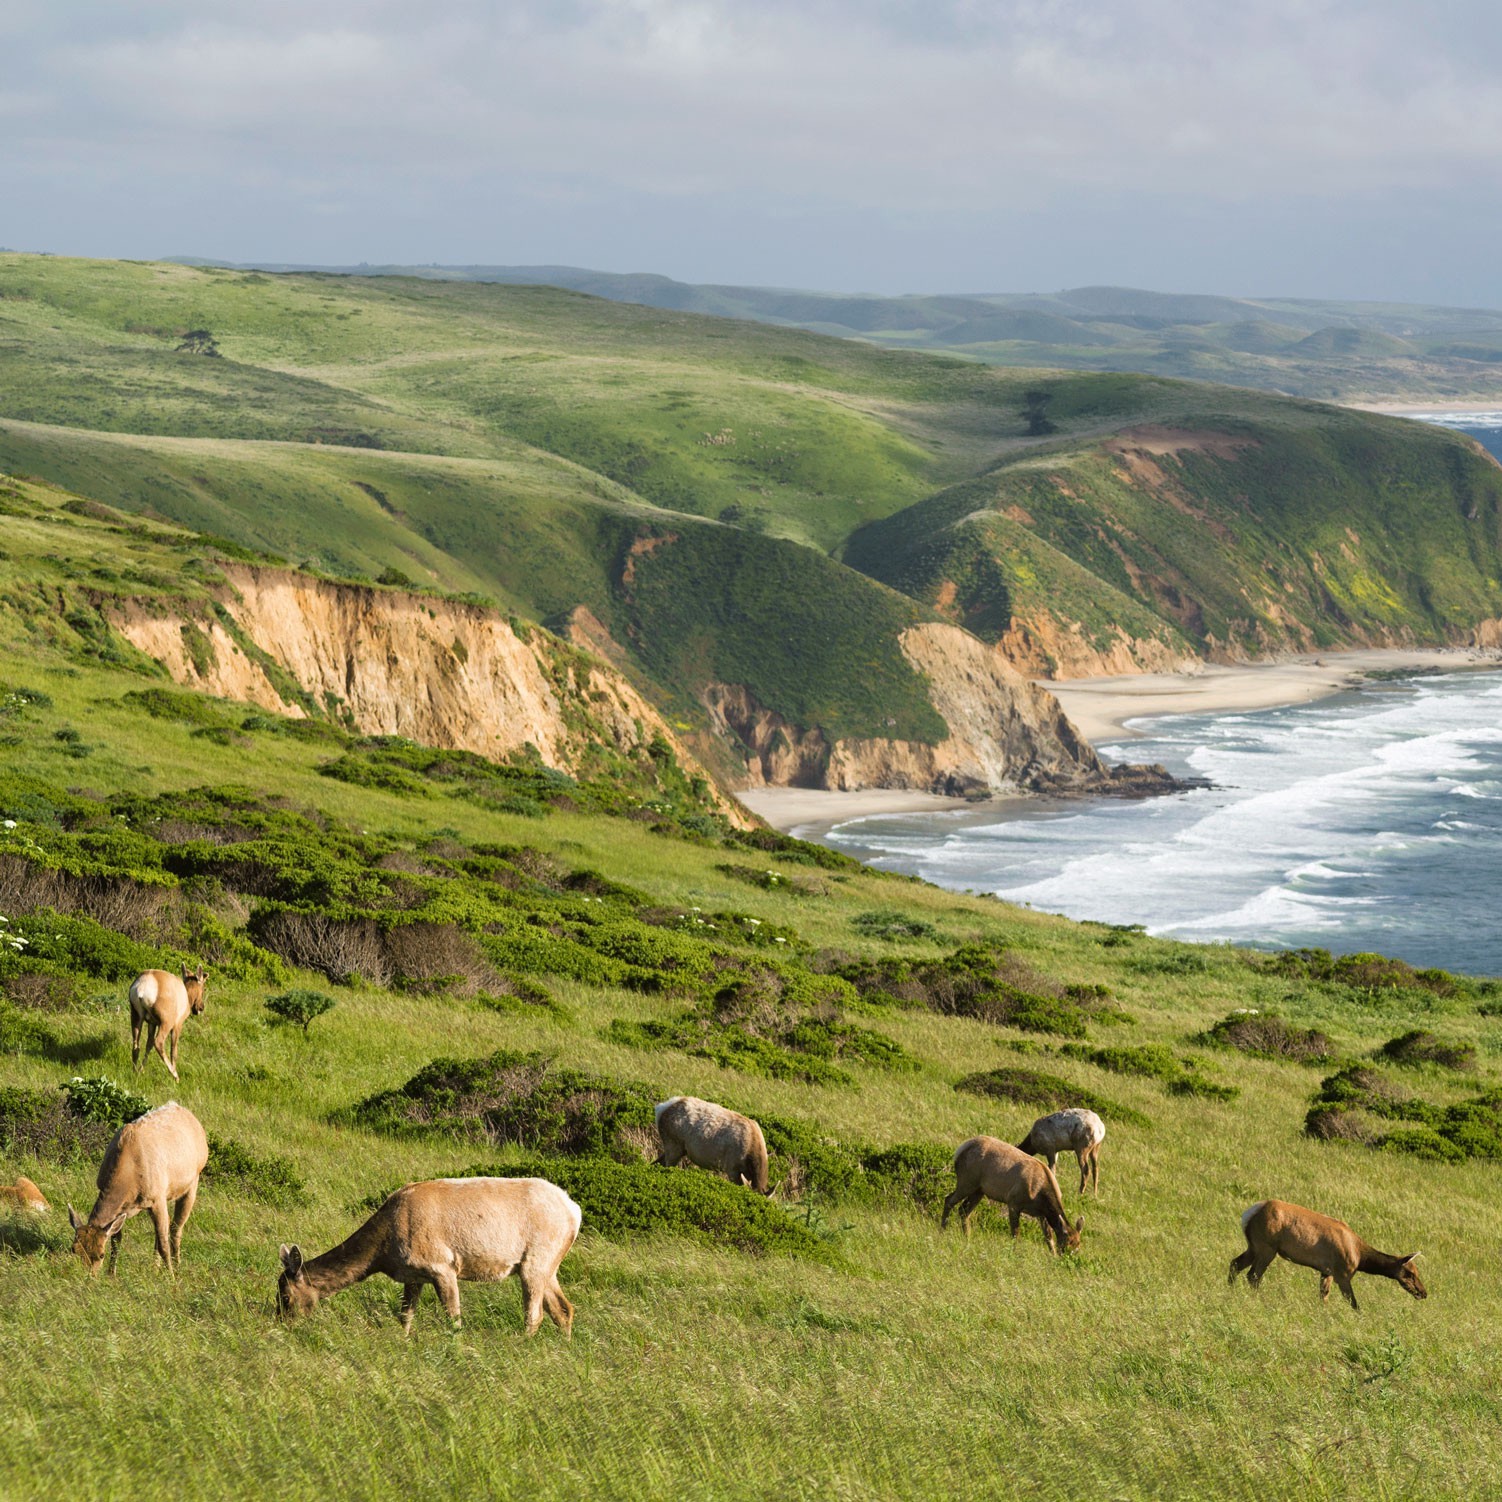
Now let's put it into practice. Download this seaside photo and upload it to your p5 sketch. Here's a reminder for displaying an uploaded image in your editor.
The goal we have here is to copy the goats from the original image and paste it to a different location on the canvas. In the example below, I have copied two goats for you. Could you try to copy a different goat?
Once you've done it yourself, you might notice that even though our canvas is at 400px by 400px, we might need to set our source X and source Y above 400. Do you have an idea for why that may be?
Tips: you could use imageMode() to let the progam know whether to treat the CENTER or the UPPER LEFT of the image as (0,0).
Make a Pixelator
Now that we know how copy() works, let's combine it with createCapture() and make a real-time pixelator!
Pixelation happens when a raster image is enlarged to the point where individual pixels are revealed, resulting in blurriness and fuzziness in the image. Based on this principle, we can stretch and displace regions of an image to create a pixelated effect. We will use a nested for loop to copy a grid from the source image and paste the grid onto the canvas.
Source CodeOnce you feel comfortable with the pixelator tutorial, check out this example that creates a swaying effect by combining the technique with a sine wave.
set() and get()
set() and get() are easy-to-use functions that let you directly interact with the pixels on your canvas. set() lets you write pixels to the canvas and get() lets you read pixels() from the canvas.
set(x, y, c)
In order to use set(), you would need to specify which x, y positions you would like to place the pixel in, and what color you would like the pixel to use.
get(x, y)
In order to use get() you first need to make sure that the canvas isn't empty. Specify the x and y of the pixel you would like to read, and a color value will return which you could use for something else in your sketch.
What's Inside a Pixel?
A pixel is the smallest element in a digital image. Every pixel on your screen contains an array of [R, G, B, A]. R stands for red, G stands for green, B stands for blue, and A stands for the alpha channel, which controls opacity. Let's write a few lines of code so that we could read the array of a pixel in our console:
If you print c into the console, you would see an array of four different values, each representing the R, G, B, and Alpha channel of the single pixel that is right underneath the tip of the cursor. Since we've set the background to green, getting the pixel at any part of the canvas is going to give us a reading of [0, 255, 0, 255].
Let's move forward to a more nuanced example using the seaside photo as the background. I'm using set() to display the image in draw(). And I'm also using mouseX and mouseY as the x and y values in get(), so that when you hover over the screen, you would see the color of the pixel you're hovering over displayed inside the square —
↳ hover over the screen to pick a color from the image
Source CodeHere's another example that uses both set() and get() in a clever way —
As you can see, I've placed the get inside set(), so that everytime set() is executed, it loads get() which finds anoter pixel at a relative position to grab.
Source CodeMake a Pointillist Filter
Next, let's create an experimental camera that will render the subject as a pointillist portrait. We will combine createCapture() + get() to acheive this effect:
Source CodeloadPixels() and updatePixels()
In the last section we have covered the fact that every pixel contains an array of [R, G, B, A] values. Now we are going to talk about pixels[], which is another way to write pixel values into your program. Its purpose is identical to set(), however the performance speed is faster, and that's useful for when you need to make a lot of modifications to the pixel array.
Pixel Array
In this example, we will combine pixel[] and a nested for Loop to create a gradient image as shwon above. But first, you should call loadPixels() in the beginning of draw() and updatePixels() at the end of draw(). These functions help loading the displaying the pixels onto the canvas.
And now here's the fun part. We're going to use a nested for Loop to draw a grid of pixels. And we're going to use let index to count every row of the pixel grid.
If you're confused by what's going on inside the for Loop, here's a thorough tutorial that explains what it means.
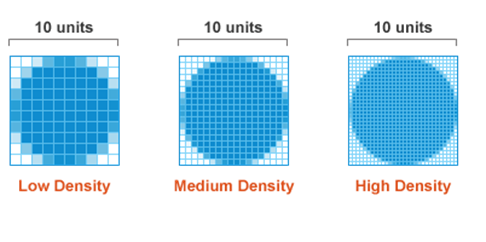
Now if you have a high pixel density display such as a retina screen, when you click on play you will see the pixels only filling part of the screen instead of all of the screen. Because by default, pixel density in p5 is set to match the display density.
To make the pixel density in p5 adopt to your display density, you would have to set pixelDensity() to 1:
Source CodeMake a Rainbow Gradient Filter 🌈
By combining the pixel array example with createCapture(), you could create a rainbow gradient filter similar to the ones you see in social media apps! I'm also going to intergrate it with createSlider(), so that the user can adjust the level of redness in the image:
Source CodePerformance Management
There is a benefit that comes along with working on the web, but there is also a limit to how many things the browser is able to handle at a time. Here are a couple tips on working with image processing within the scope of this project —
- (1) Save or duplicate your sketches more frequently than usual. If a progam crashes you might lose your source code.
- (2) When you're writing a for loop, start from creating a very small number of repetitions and gradually scale up. 3 is a good starting point :)
- (3) Skip over some of the pixel arrays in the for loop. You don't always need to be drawing every single pixel array. Try skipping by increasing the number of i++ and you could improve your speed significantly.
- (4) If you're interested in monitoring the speed performance of your sketch, you could integrate stat.js, which will display the FPS (frame per second) of your browser at the current moment. Here's an integrated example.
- (5) Every medium has a constraint. Even a magician is constrained by their props. Re-evaluate your original idea based on the constraint of our particular medium and ask yourself what is effective. Maybe instead of drawing 200 dots at once, it's just as effective to draw one dot that would swarm around the screen?