Experimental Camera
Objective
Design and code an experimental camera that expresses a novel way of capturing a body, a place, or an object.
Description
Conventional cameras imitate the resolution, depth of field, and color range of the human eyes. The machine’s close
resemblance to human biology and its claim to deliver objective reality camouflages the embedded biases in camera
technology such as the unfortunate racial bias
in the history of photography.
For Assignment #6, you will design and create an experimental camera
with a specific purpose or usage in mind. Some questions to get you started:
- What does it mean to design a camera that is meant to capture a specific person, place, or object?
- How might we document our domestic life while we self-quarantine? Has the selfie culture and photography carried on different meanings since the start of the pandemic?
- How can camera filters change the way we perceive ourselves and the others?
Make an intentional choice on the context your camera should be used in. Document your camera set up and a series of images you take with the camera. You are expected to utilize createCapture() and array in your camera design.
Design Constraint
Canvas Size: Flexible, but please be very intentional with your choice of dimensions.
Part 1 : Due 11/12
- Begin with ideation and brainstorm 3 different ways of capturing your subject. Consider how your experimental camera gives new meanings of your subjects through this process.
- Create 3 design sketches accommodated by pseudocode that incorporates:
- Array
- createCapture()
- You are also encouraged to integrate any other programming concepts covered in the additional tutorials
Part 2 : Due 11/16
- You will present your sketches in Lab, then you will move forward with one idea after discussing with your CC faculty and peers. Update your pseudocode as needed.
- Transfer your sketch and pseudocode into the p5 sketch. Create a test shoot using your experimental camera and make sure that you’re producing desired outcomes.
- On your CC portfolio page, please include the following:
- A series of 5~10 images taken with your experimental camera.
- A description for your experimental camera. What is the purpose and usage of your camera? What subject is it meant to capture? And what kinds of meaning emerge through seeing your subject through your experimental camera?
- Describe your design process. Include all three of your design sketches and explain how you’ve ended up choosing one.
- Your overall reflection on the assignment:What have you learned throughout the process of designing an unconventional camera? How is the process of “seeing” shaped by the choices you make in code?
Submission Guidelines
Please submit your sketch to two places:
- Submit the sketch to the CC Lab class Canvas Assignment 6
- Add the sketch to your CC portfolio
Tutorials
- 6.1 Array (YouTube), Katherine
- 6.2 Pixel Array (YouTube), Katherine
- Bonus Tutorial: Pixelator (YouTube), Xin
- Bonus Tutorial: Pointillist Filter (YouTube), Xin
References
- User is Present , Kate Hollenbach
- Gaze Makes the Glitch, Cyber Witch
- Shrub, Linked by Air & Jeffrey Scudder
- Facial Weaponization Suite, Zach Blas
- Merge / Multix / Sheets / Gush, Adam Ferriss
- Glance Back, Maya Man
- AR Experiments, multiple creators
Resources
- Instagram Filters with p5.js, Kelly Lougheed
- Beyond the Canvas, Evelyn Masso
- Video and Pixels Playlist, Coding Train
- Creating face filters with clmtrackr.js + p5.js, Lauren McCarthy
- Computer vision examples, Kyle McDonald
- clmtrackr.js References, Audun Mathias Øygard
- p5.js Shaders Tutorial, Casey Conchinha and Louise Lessél
- Pixel Manipulation with p5.js: Build your own video mirror!, jiwon
clmtrkr.js Study Guide
Many of you are curious about exploring facial recognition for this project, so I'm adding a chapter on clmtrkr.js, a JavaScript library that can be easily intergrated into p5.js. You can use it to create AR face filters, analyze facial expressions, or even use your face as an input to play a game.
This might sound complicated, but the good news is the mechanism actually works very similarly to the textToPoints() function we've already worked with in Project #2. Instead of translating text into an array of x and y, clmtrkr.js helps translating our facial contour into a sequence of points —
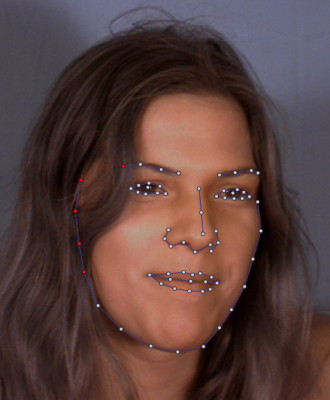
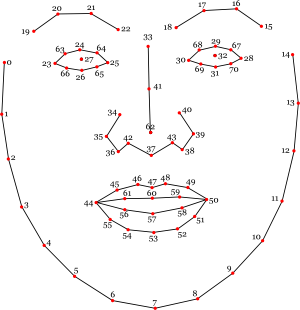
What's convenient is that clmtrkr will always generate a total of 70 points around the face, so if you want to draw something on the tip of the nose it will always be point 62, the left eye and the right eye will always be point 27 and 32.
If you want to learn more about how clmtrkr works behind the scene, I'd recommend checking out this blog post.
Setting up clmtrkr.js in the p5 Editor
Let's use this code template as a starting point. It includes what we've gone through in the createCapture() section above. To add the clmtrkr.js library into your p5 sketch, you'd want to open your index.html page and insert the library before your p5 library:
Next let's open sketch.js and create a global variable let tracker at the top of the sketch. And let's also add line 12~14 from the code example below into your setup(). I will give a brief explanation of what each of those lines does next to the code, but if you want to dig deeper please check out clmtrkr's reference page.
You've initated the clmtrackr object, but nothing is happening on the screen yet. Let's add this important line in draw() so that the tracking points will be continuously updated when the program runs.
Now all the tracking points would be stored inside positions. Next, let's add the block of code below into draw(). Using beginShape() and endShape(), we can connect all the tracking points together to draw and outline of the face!
Source Code
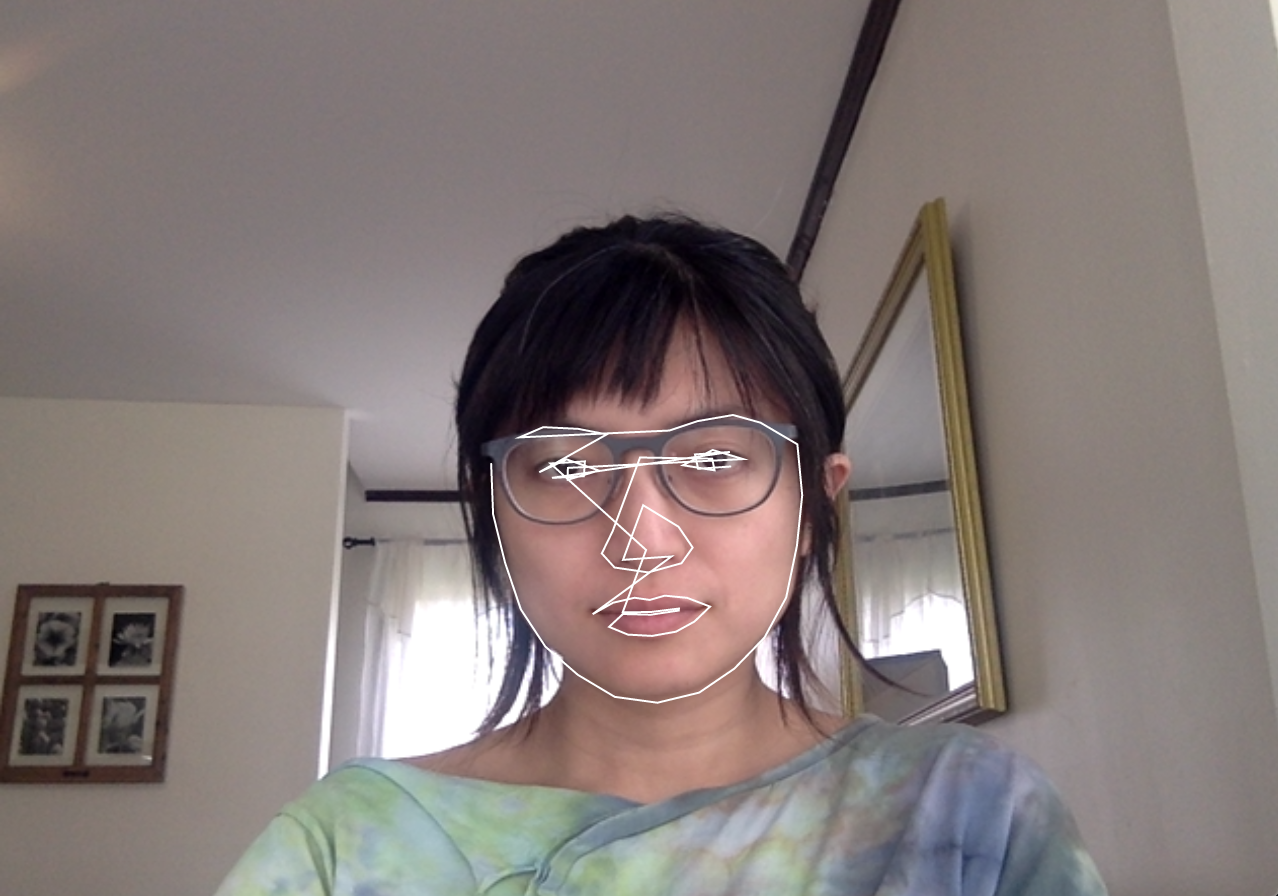
Now keep your face in the center of frame and make sure that your face is fairly well lit. If you see an overlayed white outline around your face, then congrats! You've got a basic facial recognition system in your p5 sketch.
Now, we've entered an uncharted territory here. What's actually inside positions? What is the two-bracket business in positions[i][0] and positions[i][1] all about? Hum, let's print positions in draw() to take a peak at what's inside the variable:
When you hit play, you should see something like this inside your console:
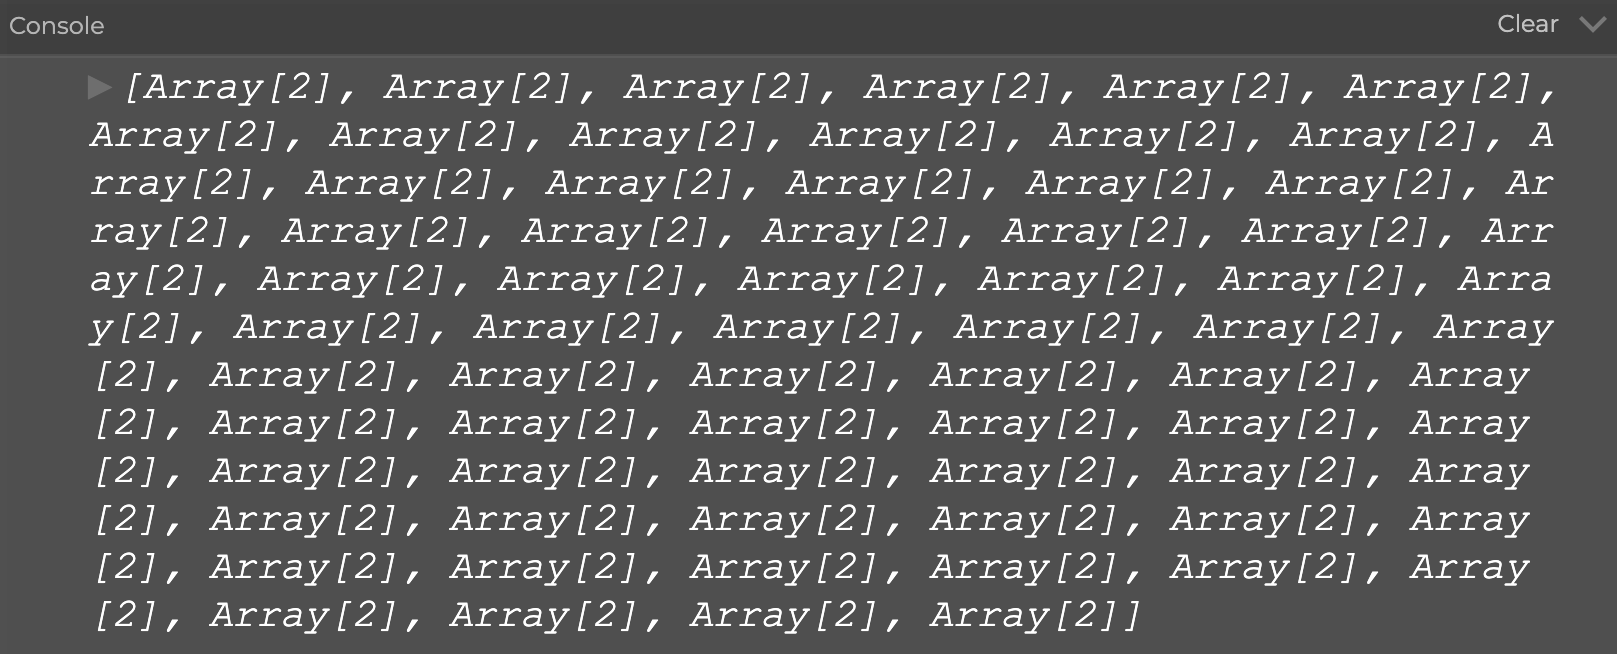
And if you stop the sketch and click on the tiny arrow in front of each print, you should be able to look inside of the structure and see something like this:
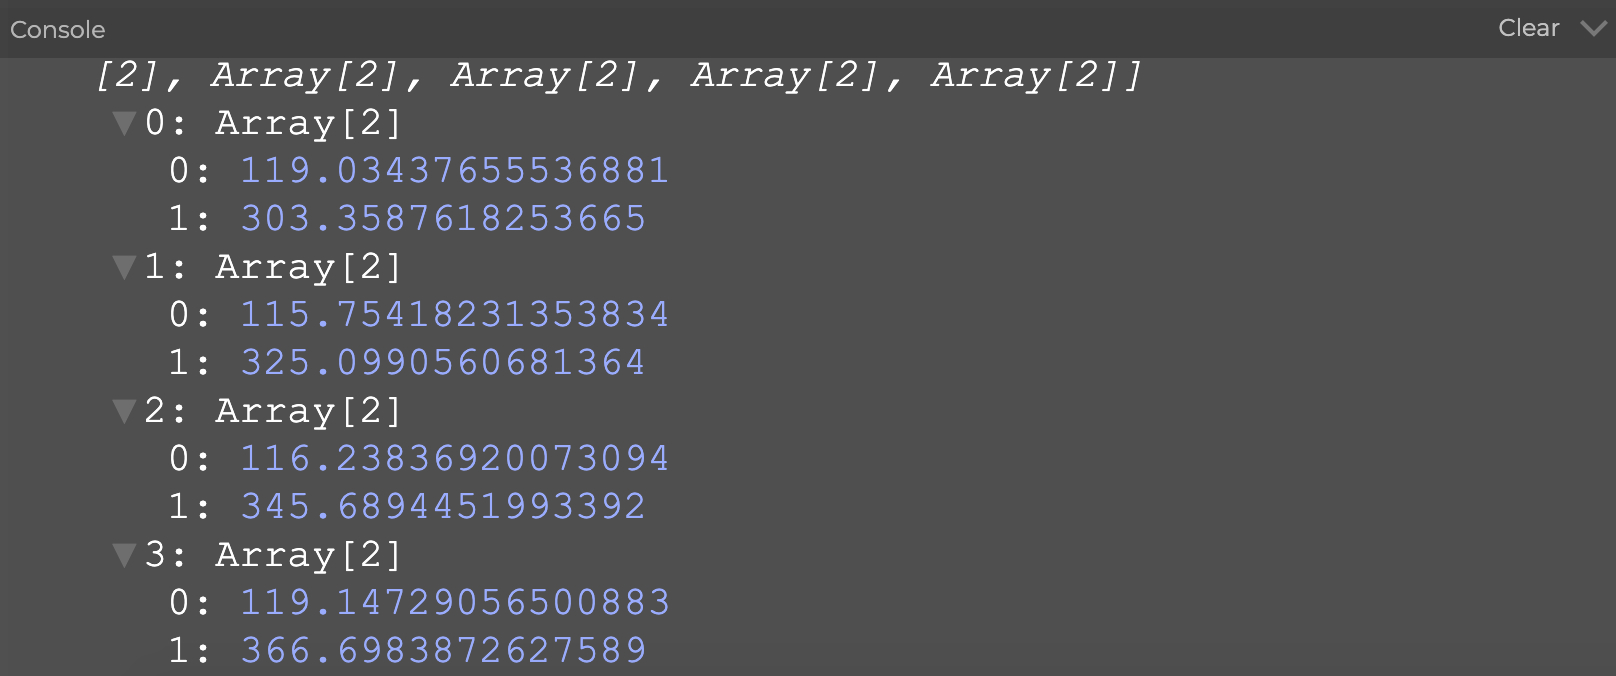
This is a new data structure that we haven't talked about in this class. It's got a fancy name — the two-dimensional array.
Two-Dimensional Array
So far we have mostly been working with one-dimensional array. If we compare writing an array to making a list, the list version of let groceries = [“pasta”, “dumplings”, “bread”] would look like this
- Pasta
- Dumpling
- Bread
However, if I really shop for those groceries in real life, I'd probably need to create a sublist under every food item, detailing what ingredients I need. And this is what two-dimensional array allows us to do — we can add an additional sublist to an exisiting list. Essentially, tw-dimensional array is an array of an array; a list of a list.
- Pasta
- Tomato
- Basil
- Spaghetti
- Dumpling
- Dumpling wrapper
- Cabbage
- Ground pork
- Bread
- Flour
- Yeast
Let's apply these concepts to p5. If I were to create a pizza ordering progarm that lets my customers choose their own toppings using a one-dimensional array, it would look like this:
And in a two-dimensional array it would look like this:
I've snuck in a neat trick, console.table() in the code. Hit play and see a surprise in the console :)
Most importantly, how do we order a specific pizza topping from array2D? If you'd like to order a plain bread, you would type this into the program:
Now here's a coding challenge for you — make the console print out "I'd like a pizza with whole wheat bread, red sauce, mushrooms with mozzarella and goat cheese". If you get stuck, check out the answer here.
Adding AR Overlay
Finally, let's return to looking at the two-dimensional arrays inside the clmtrackr exmple. It turns out that under every tracking point, there is an [x, y] array that store the x and y values of each tracking point. By writing positions[62][0] we get to access the x value of tracking point number 62, and by writing positions[62][1] we access the y value.
Knowing this, let try something fun by adding this block of code to the clmtrackr example inside draw():
If you see a circle popping up in front of your nose, hooray!
You might ask why we need to add an IF statement that checks whether positions.length is larger than 0. If you try to comment that out you will get an immediate error when the program starts. The reason for this is because it takes a second for the program to register your face. Without the IF statement, the program would try to access the positions data without actually having the data, causing the program to crash.
For the sake of organization, the next thing we could do now is to add dots and numbers to the sketch to show where each tracking points are on the screen.
Facial Expression Analysis

↳ A detail of “Machine Readable Hito,” 2017. Trevor Paglen / Metro Pictures, New York
While facial recognition software is mostly used as a discriminatory and surveillance tool, artists and designers should feel empowered to use it in ways that is critical and expressive. It's our responsibility to work with a problematic tool with thoughtfulness and intentionality.
Here's an example of how you would analyze someone's smile — add this block of code into your existing clmtrakr sketch:
Source Code
If you try out the sketch, you'd see that this idea of "emotional analysis" is actually extremely superficial. Essentially, you are just comparing the distance and relationship between two or more tracking points on the face. Try adding your own feature, such as making the bar grow if your eyebrow raises. Once you get comfortable with adding your own features, try to find creative and surprising ways to work with the technique.